
The Solo Stove and other outdoor fire pits are a wonderful way to enjoy the outdoors well during the cold nights as well as during the winter seasons. They provide illumination, thermal comfort, and help you host numerous outdoor parties. The best part about using these fire pits is that you can prepare food on them. Being able to use an open flame to prepare food is another feature of some of these.
Stainless steel construction gives the Solo Stove a long lifespan. It’s strong and can withstand tremendous heat, but it’s still light enough to be moved by one person, so you can take it from the garage to the backyard or even to a friend’s house or a campsite.
The airflow in a Solo Stove fire pit is designed to almost eliminate smoke, although wet wood, ash buildup, and using too much fuel could compromise this. Is this your first time cooking on this firepit? Well, don’t worry! We have formulated some tips and tricks that will make this a smooth ride. Follow these tips for making the most of your Solo Stove at any party and impressing your guests without producing any smoke.
Tip 1: Dispose of the Smoke and Ash Right Away!
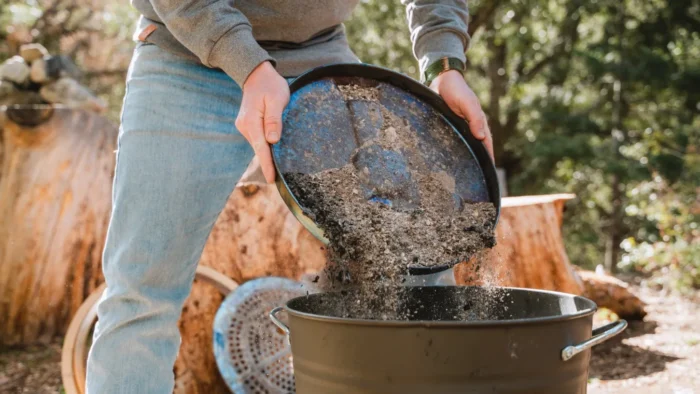
The Solo Stove’s ash pan doesn’t need to be emptied after every burn, but doing so will help your fire pit get off to a good start. Although this is a very basic fix, it is often overlooked despite its significant impact.
Ashes from a fire can be easily disposed of by turning over the fire pit. But, make sure you relocate your fire pit to the edge of your property or camping area. A garbage bag in the open air can serve as a temporary ashtray if you don’t have access to any other means of disposal.
Tip 2: Build A Small Fire
A lighter, some fire starters, and some dry kindling are all you need to build a fire. Small twigs or chunks of wood work well as kindling, but we find that chopping up a bundle of juniper with a hatchet produces the best fires. If you want to start a fire, use smaller logs first and wait until the embers are glowing before adding larger logs.
The ember bed helps heat the double walls of your Solo Stove. We recommend using only very dry hardwood in your Solo Stove. If the wood is dry, the fire will start quickly and burn brightly. Also, ensure to follow the safety precautions while building a fire.
Tip 3: Be Creative and Combine Things!
In the event that your fire starts to die out, you can use any equipment to aerate the wood and revive it. All woods will burn, but dry, dense woods are best for optimal effectiveness in a fire. Hardwoods, including birch, maple, hickory, and oak, burn for significantly longer than softwoods.
We recommend using around 4–6 medium-sized logs. The fire pit should not be overloaded. You can always throw a few more logs on top of a bed of glowing embers. Turn the stove upside down once the fire has died down to empty out the ashes. Place your Bonfire in a cool, dry place when it’s not in use.
Tip 4: Clear the Area of Any Litter or Debris
Before lighting the bonfire, it is vital to clear the space around it of flammable types of debris. If you want to use these to light your campfire, you can, but make sure the place is safe first.
There is always a chance that when the fire gets really hot, some little embers or chunks of wood will be ejected, despite the fact that these devices are made to burn cleanly. That’s why being cautious is more important than having fun.
Is The Solo Stove Really Smokeless?
Both of the walls of the Solo Stove are hollow. The outer wall is perforated at its lower edge, while the inside wall is perforated again towards its upper edge. A perforated wood holder and a non removable ash collection base are located at the item’s underside.
A secondary, more intense, and smokeless fire can be achieved by drawing air from the outside through the holes and forcing it back in via the internal ones while the wood burns. The Solo Stove can be converted into a grill, griddle, or even a wok with the purchase of optional accessories. The Solo Stove Firepit is an amazing buy.
Since we aren’t used to keeping an eye on a flame while we cook, it is advised to get the grill plate. It can be challenging to get the right logs for it because pre-cut logs from the grocery store are too big. Make sure the flames are contained within the device and that the cooking attachments have fully heated before you start cooking.
Final Word
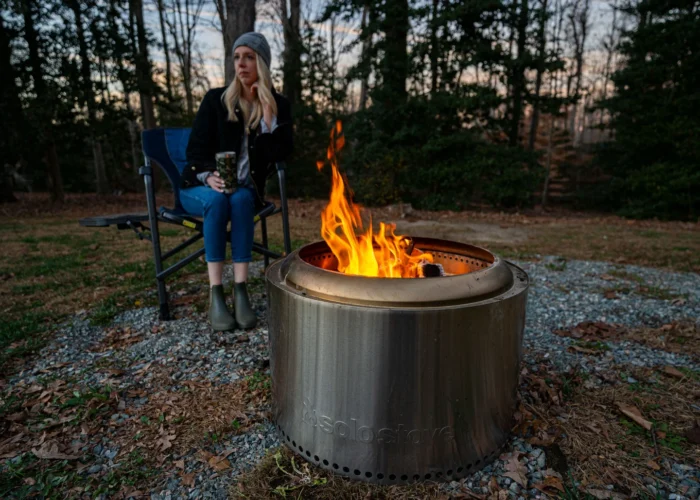
The Solo Stove is ideal for gatherings of up to eight people because the fire’s warmth is contained inside a 2-foot radius around the pit. This stove is an excellent replacement for a fire pit, as it produces more heat and can seat up to sixteen people.
Keep in mind that it will require more fuel to keep the fire going and that it weighs nearly twice as much as the bonfire. However, the device is quite portable and you can easily move it around.
The Solo Stove Bonfire is a fantastic buy and offers numerous advantages. If you want to enjoy hosting an outdoor party on a chilly night and wish to prepare some dishes, this device will prove to be your one stop solution.
It works perfectly and all you need to do is assemble it and you are good to go. The structure is not only aesthetically beautiful, but it also makes constructing and tending a campfire much simpler than ever before. When used properly, it doesn’t produce any smoke, and you won’t need a campfire pit anymore.


