
Pipetting first got its start in the 1940s and has since become a widely used method to test sample liquids.
There are now many ways of pipetting which include both manual techniques and automated such as a liquid handling robot.
In this article, we will look at some of the more popular pipetting techniques as well as common errors in pipetting and how to avoid these mistakes.
Common Pipetting Styles

Some common methods for pipetting include:
Air displacement pipettes
Air displacement pipettes are a type of micropipette and are made to handle liquids in micro-liters. These are piston-driven and dispense liquid through an air cushion that lies at the tip of the pipette. Air displacement pipettes are not commonly used in chemistry because of the sensitivity of the equipment which has the potential to be damaged by various organic matters.
They are a favorite in biochemistry and biology, however, because they can hold samples in a contained and highly sterile method. The main parts of a micropipette are the tip ejector button, plunger button, digital volume indicator, volume adjustment dial, shaft, and attachment point for a disposable tip.
Positive displacement pipette
Positive displacement pipettes work via piston-driven displacement. However, unlike the above, these positive displacement pipettes make contact with the sample rather than dispensing through the air force. This helps the aspiration force to stay regular and does not get affected by the liquid’s physical components. These types of pipettes are used to pipette samples that are volatile, have extreme temperatures, are vicious, and are made of corrosive materials.
Electronic pipettes
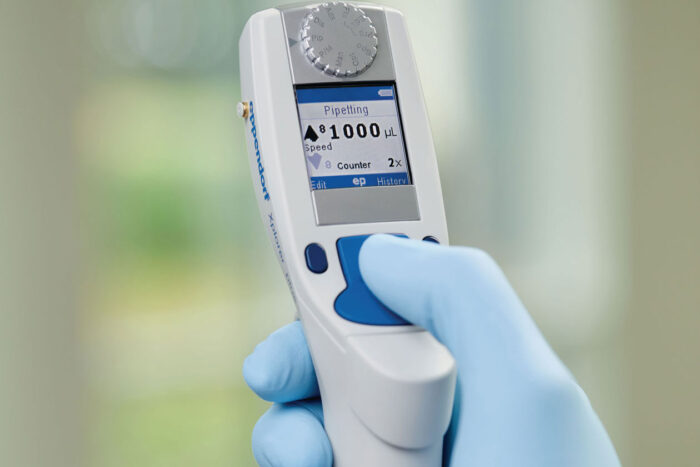
Electronic pipettes are built for sampling procedures that have a high repetition. These are made in various styles, from handheld pipettes which often feature an ergonomic design, and are often built to test multiple samples at the same time.
Electronic pipettes are known for their efficiency and can often achieve higher accuracy in testing results. They are also appreciated for their aid in relieving the arduous physical task of testing which can help to avoid potential musculoskeletal disorders that may develop from piping repetitively.
Multichannel pipettes
A multichannel pipette hosts between 8 to 12 channels that can test individual liquids at the same time. These pipettes help with the efficiency of sample testing and are built to work with 96- or 384-well plates. There are a number of these styles produced, both in electronic and manual styles. A specific model is chosen based on what is required in the testing process including the level of precision, the amount of liquid being tested, and the amount of repetition.
Incorrect pipetting methods and their solutions
While it may seem like a straightforward way of testing liquids, it is important to maintain awareness of testing precision so that you can achieve highly accurate test results. This said, there are some common errors made when testing with pipettes that if you are aware of you will be able to save time and money.
Some common methods of incorrect pipetting

Dispensing in an inconsistent manner
It is important to make sure that dispensing liquid into a vial is dispensed fully and methodologically. This can help to improve the overall accuracy of the samples. The main goal to achieve here is for all the liquid to be dispensed. The best way that this can be done is to rest or move the tip of the pipette against the sample container. This will help to remove as much of the sample liquid as possible and can help to increase the accuracy of the sample by more than 1%.
Ignoring pre-rinsing a pipette
When liquid is dispensed from a pipette there is a residue left on the tip. This works against the sampling process as any liquid that is dispensed from there becomes less than it would with a clean tip. The way to combat this issue is to pre-rinse a new tip two or more times with the same liquid that will be used as a sample. This will lubricate the pipette tip which will allow the liquid to be released fully.

Immersing the tip at an incorrect depth
When the tip is immersed into the sample container more than necessary, too much of the sample liquid will become aspirated. The solution for this is to make sure that you immerse the tip to the correct depth. Common measurements include a 3-6 mm immersion for normal-range pipettes and a 1-2 mm immersion for micro-volume pipettes. Ensuring that you are following the correct immersion range can achieve a higher results accuracy of up to 5%.
Using an inconstant rhythm when pipetting
Pipetting in a rushed manner can bring inconsistent results. Switching instead to a consistent rhythmic motion between samples can help to bring the results you want.
Placing the pipette at an incorrect angle. The angle of immersion plays an important part in an accurate sampling procedure. An angle leaning towards horizontal may cause too much liquid aspiration due to the liquid being drawn back in the tip with any angle falling more than 20 degrees from vertical can cause aspiration issues To resolve this issue, focus on immersing the pipette vertically as much as is possible and keep it from leaning under the 20-degree mark.
Immersion depth guide

The depth at that the pipette tip is immersed in a solution has a significant impact on the accuracy of the resulting sample. Immersing the tip as minimally as possible should be applied in all sample testing. At the same time, too shallow of immersion can have unwanted effects as well.
To ensure correct results, you can follow these recommended guidelines:
- 0.1 – 1 μL – 1mm
- 1 – 100 μL – 2 – 3mm
- 100 – 1000 μL – 2 – 4mm
- 1000 – 10,000 μL – 3 – 6mm
When it comes to sampling testing, it is always a good idea to be well informed so that you can be confident and efficient in liquid testing procedures.


